F5 Programmability Training > Class 1: Introduction to Automation & Orchestration > Module 1: Imperative Automation with the BIG-IP iControl REST API Source | Edit on
Lab 1.3: Review/Set Device Settings
All devices are already licensed so we can focus on configuring the basic infrastructure related settings to complete the Device Onboarding process. The remaining items include (list not exhaustive):
- Device Settings
- NTP/DNS Settings
- Remote Authentication
- Hostname
- Admin Credentials
- L1-3 Networking
- Physical Interface Settings
- L2 Connectivity (VLAN, VXLAN, etc.)
- L3 Connectivity (Self IPs, Routing, etc.)
- HA Settings
- Global Settings
- Config Sync IP
- Mirroring IP
- Failover Addresses
- CMI Device Trusts
- Device Groups
- Traffic Groups
- Floating Self IPs
- Global Settings
We will specifically cover the items in BOLD above in the following labs. It should be noted that many permutations of the Device Onboarding process exist due to the nature of real-world environments. This class is designed to teach enough information so that you can then apply the knowledge learned and help articulate and/or deliver a specific solution for your environment.
Task 1 - Set Device Hostname & Disable GUI Setup Wizard
In this task we will modify the device hostname and disable the GUI
Setup Wizard. The Resource that contains these settings is
/mgmt/tm/sys/global-settings.
Perform the following steps to complete this task:
Expand the
Lab 1.3 - Review/Set Device Settingsfolder in the Postman collection.Click the
Step 1: Get System Global-Settingsrequest. Click the Send button and review the response Body to see what the current settings on the device are. Examine the resulting response to understand what settings are currently applied.Click the
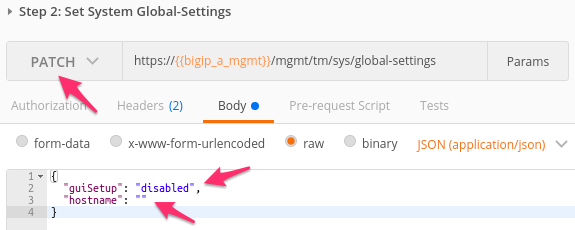
Step 2: Set System Global-Settingsrequest. This item uses aPATCHrequest to theglobal-settingsresource to modify the attributes contained within it. We will update theguiSetupandhostnameattribute.Click on Body. Review the JSON body and modify the
hostnameattribute to set the hostname tobigip-a.f5.localAlso notice that we are disabling the GUI Setup Wizard as part of the same request:
Click the Send button and review the response Body. You should see that the attributes modified above have been updated by looking at the response. You can also
GETtheglobal-settingsby sending theStep 1: Get System Global-Settingsrequest again to verify they have been updated.
Task 2 - Modify DNS/NTP Settings
Note
This task will make use of JSON arrays. The syntax for defining a JSON array is:
myArray: [ Object0, Object1 ... ObjectX ]
To define an array consisting of Strings the syntax is:
myStringArray: [ "string0", "string1" ... "stringX" ]
Much like the previous task we can update system DNS and NTP settings by
sending a PATCH request to the correct resource in the sys Organizing
Collection. The relevant Resources for this task are:
| URL | Type |
|---|---|
/mgmt/tm/sys/dns |
DNS Settings |
/mgmt/tm/sys/ntp |
NTP Settings |
Perform the following steps to complete this task:
Click the
Step 3: Get System DNS Settingsitem in the folder. Click Send and review the current settings.Click the
Step 4: Set System DNS Settingsitem in the folder. Click Body. Review the JSON body to verify the name server IPs4.2.2.2and8.8.8.8are listed. Additionally, add a search domain off5.local. You will modify a JSON array to add a search domain: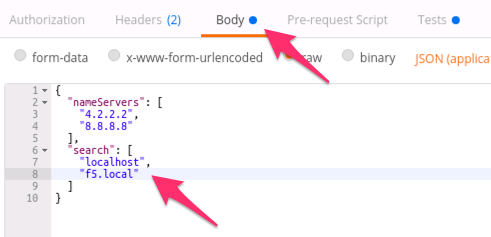
Click the Send button and verify the requested changes were successfully implemented by looking at the response or by sending the
Step 3: Get System DNS Settingsrequest again.Click the
Step 5: Get System NTP Settingsitem in the folder. Click Send and review the current settings.Click the
Step 6: Set System NTP Settingsitem in the folder. Click Body. Review the JSON body to verify the NTP servers with hostnames0.pool.ntp.organd1.pool.ntp.orgare contained in theserversattribute (another JSON array!).Click the Send button and verify the requested changes were successfully implemented by looking at the response or sending the
Step 5: Get System NTP Settingsagain.
Task 3 - Update default user account passwords
In this task we will update the passwords for the root and admin
accounts. The process for updating the root account is different than
other system accounts because it is used by underlying Linux OS.
To update the root account password we will use a POST to the
/mgmt/shared/authn/root REST endpoint.
To update all other system accounts we will PATCH the
/mgmt/tm/auth/user/<username> Resource.
Perform the following steps to change the root user password:
Click the
Step 7: Set root User Passworditem in the folder.We are performing a POST operation to change the root user password and have to specify the
oldPasswordbecause the REST implementation on the BIG-IP uses the underlying Linux mechanism. Click Body. Modify the JSON body to update the password to the valuenewdefaultand click the Send button.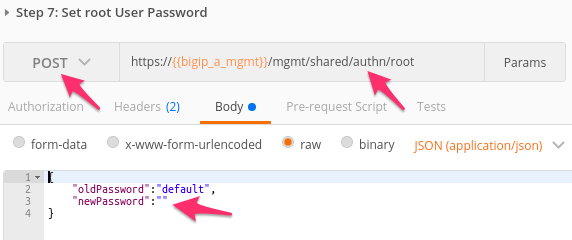
You can verify the password has been changed by opening an SSH session to BIG-IP A. A shortcut to a terminal is included on the desktop of the Linux jumphost. Open a Terminal window and then open an SSH connection to BIG-IP A using the command
ssh root@10.1.1.10: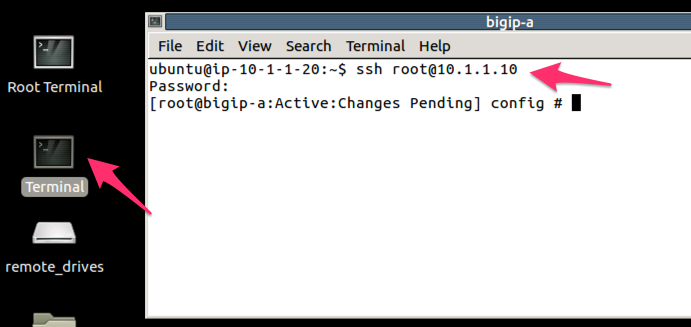
Repeat the procedure above to change the password back to
default.
Perform the following steps to change the admin user password:
Click the
Step 8: Set admin User Passworditem in the collection.We are performing a
PATCHoperation to admin user Resource. Click Body and modify the JSON body to update the password to the valuenewadminand click the Send button.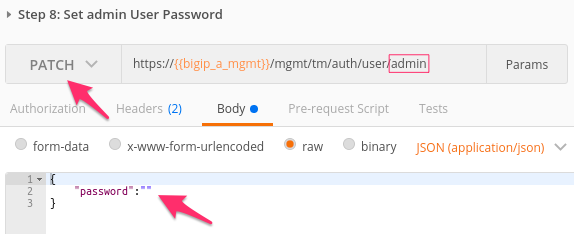
- You can verify the password has been changed by opening an SSH session
OR by logging into TMUI (HTTP GUI) to BIG-IP A in a Chrome browser tab.
Repeat the procedure above to change the password back to
admin.